データベースサーバー(MySQL)を構築して見る事にします。

[root@meckk ~]# yum -y install mysql-server
インストール処理の設定をしています
依存性の解決をしています
--> トランザクションの確認を実行しています
---> パッケージ mysql-server.armv5tel 0:5.1.39-4.fc12.fa1 を更新に設定しました
--> 依存性の処理をしています: mysql = 5.1.39-4.fc12.fa1 のパッケージ: mysql-server-5.1.39-4.fc12.fa1.armv5tel
--> 依存性の処理をしています: perl-DBI のパッケージ: mysql-server-5.1.39-4.fc12.fa1.armv5tel
--> 依存性の処理をしています: perl-DBD-MySQL のパッケージ: mysql-server-5.1.39-4.fc12.fa1.armv5tel
--> 依存性の処理をしています: perl(DBI) のパッケージ: mysql-server-5.1.39-4.fc12.fa1.armv5tel
--> トランザクションの確認を実行しています
---> パッケージ mysql.armv5tel 0:5.1.39-4.fc12.fa1 を更新に設定しました
---> パッケージ perl-DBD-MySQL.armv5tel 0:4.013-2.fc12 を更新に設定しました
---> パッケージ perl-DBI.armv5tel 0:1.609-3.fc12 を更新に設定しました
--> 依存性解決を終了しました

依存性を解決しました

==========================================================================================
 Package                Arch             Version                     Repository      Size
==========================================================================================
インストールしています:
 mysql-server           armv5tel         5.1.39-4.fc12.fa1           fedora         8.6 M
依存性関連でのインストールをしています:
 mysql                  armv5tel         5.1.39-4.fc12.fa1           fedora         3.6 M
 perl-DBD-MySQL         armv5tel         4.013-2.fc12                fedora         141 k
 perl-DBI               armv5tel         1.609-3.fc12                fedora         683 k

Transaction Summary
==========================================================================================
Install       4 Package(s)
Upgrade       0 Package(s)

総ダウンロード容量: 13 M
パッケージをダウンロードしています:
(1/4): mysql-5.1.39-4.fc12.fa1.armv5tel.rpm                        | 3.6 MB     00:21
(2/4): mysql-server-5.1.39-4.fc12.fa1.armv5tel.rpm                 | 8.6 MB     00:50
(3/4): perl-DBD-MySQL-4.013-2.fc12.armv5tel.rpm                    | 141 kB     00:01
(4/4): perl-DBI-1.609-3.fc12.armv5tel.rpm                          | 683 kB     00:05
------------------------------------------------------------------------------------------
合計                                                      163 kB/s |  13 MB     01:22
rpm_check_debug を実行しています
トランザクションのテストを実行しています
トランザクションのテストを終了しました
トランザクションのテストを成功しました
トランザクションを実行しています
  インストールし : perl-DBI-1.609-3.fc12.armv5tel                                     1/4
  インストールし : perl-DBD-MySQL-4.013-2.fc12.armv5tel                               2/4
  インストールし : mysql-5.1.39-4.fc12.fa1.armv5tel                                   3/4
  インストールし : mysql-server-5.1.39-4.fc12.fa1.armv5tel                            4/4

インストールしました:
  mysql-server.armv5tel 0:5.1.39-4.fc12.fa1

依存性関連をインストールしました:
  mysql.armv5tel 0:5.1.39-4.fc12.fa1        perl-DBD-MySQL.armv5tel 0:4.013-2.fc12
  perl-DBI.armv5tel 0:1.609-3.fc12

完了しました!
[root@meckk ~]#


MySQL の設定を行います。

[root@meckk ~]# vi /etc/my.cnf
[mysqld]
datadir=/mnt/disk1/mysql 容量の大きい領域に変更
socket=/var/lib/mysql/mysql.sock
user=mysql
default-character-set = utf8 追加

# Default to using old password format for compatibility with mysql 3.x
# clients (those using the mysqlclient10 compatibility package).
old_passwords=1

# To allow mysqld to connect to a MySQL Cluster management daemon, uncomment
# these lines and adjust the connectstring as needed.
#ndbcluster
#ndb-connectstring="nodeid=4;host=localhost:1186"

[mysqld_safe]
log-error=/var/log/mysqld.log
pid-file=/var/run/mysqld/mysqld.pid

[ndbd]
# If you are running a MySQL Cluster storage daemon (ndbd) on this machine,
# adjust its connection to the management daemon here.
# Note: ndbd init script requires this to include nodeid!
connect-string="nodeid=2;host=localhost:1186"

[ndb_mgm]
# connection string for MySQL Cluster management tool
connect-string="host=localhost:1186"
[client] 追加
default-character-set = utf8 追加


[root@meckk ~]# /etc/rc.d/init.d/mysqld start
MySQL データベースを初期化中:  Installing MySQL system tables...
100618 13:26:39 [Warning] Forcing shutdown of 2 plugins
OK
Filling help tables...
100618 13:26:42 [Warning] Forcing shutdown of 2 plugins
OK

To start mysqld at boot time you have to copy
support-files/mysql.server to the right place for your system

PLEASE REMEMBER TO SET A PASSWORD FOR THE MySQL root USER !
To do so, start the server, then issue the following commands:

/usr/bin/mysqladmin -u root password 'new-password'
/usr/bin/mysqladmin -u root -h meckk.com password 'new-password'

Alternatively you can run:
/usr/bin/mysql_secure_installation

which will also give you the option of removing the test
databases and anonymous user created by default.  This is
strongly recommended for production servers.

See the manual for more instructions.

You can start the MySQL daemon with:
cd /usr ; /usr/bin/mysqld_safe &

You can test the MySQL daemon with mysql-test-run.pl
cd /usr/mysql-test ; perl mysql-test-run.pl

Please report any problems with the /usr/bin/mysqlbug script!

The latest information about MySQL is available at http://www.mysql.com/
Support MySQL by buying support/licenses from http://shop.mysql.com/

                                                           [  OK  ]
MySQL を起動中:                                            [  OK  ]
[root@meckk ~]# chkconfig mysqld on
[root@meckk ~]# chkconfig --list mysqld
mysqld          0:off   1:off   2:on    3:on    4:on    5:on    6:off
[root@meckk ~]#


[root@meckk ~]# vi /etc/my.cnf
[root@meckk ~]# mysql_secure_installation


NOTE: RUNNING ALL PARTS OF THIS SCRIPT IS RECOMMENDED FOR ALL MySQL
      SERVERS IN PRODUCTION USE!  PLEASE READ EACH STEP CAREFULLY!


In order to log into MySQL to secure it, we'll need the current
password for the root user.  If you've just installed MySQL, and
you haven't set the root password yet, the password will be blank,
so you should just press enter here.
Enter current password for root (enter for none): ←空ENTER
OK, successfully used password, moving on...

Setting the root password ensures that nobody can log into the MySQL
root user without the proper authorisation.
Set root password? [Y/n] ←空ENTER(rootパスワード設定)
New password: ←パスワードを入力
Re-enter new password: ←パスワードを再度入力
Password updated successfully!
Reloading privilege tables..
 ... Success!


By default, a MySQL installation has an anonymous user, allowing anyone
to log into MySQL without having to have a user account created for
them.  This is intended only for testing, and to make the installation
go a bit smoother.  You should remove them before moving into a
production environment.
Remove anonymous users? [Y/n] ←空ENTER(匿名ユーザー削除)
 ... Success!

Normally, root should only be allowed to connect from 'localhost'.  This
ensures that someone cannot guess at the root password from the network.
Disallow root login remotely? [Y/n] ←空ENTER(リモートからのrootログイン禁止)
 ... Success!

By default, MySQL comes with a database named 'test' that anyone can
access.  This is also intended only for testing, and should be removed
before moving into a production environment.
Remove test database and access to it? [Y/n] ←空ENTER(testデータベース削除)
 - Dropping test database...
 ... Success!
 - Removing privileges on test database...
 ... Success!

Reloading the privilege tables will ensure that all changes made so far
will take effect immediately.
Reload privilege tables now? [Y/n] ←空ENTER
 ... Success!

Cleaning up...


All done!  If you've completed all of the above steps, your MySQL
installation should now be secure.

Thanks for using MySQL!


[root@meckk ~]#


作成したroot パスワードで MySQL にアクセスできるかを確認して見ます。

[root@meckk ~]# mysql -u root -p

Enter password: ←パスワードを入力
Welcome to the MySQL monitor.  Commands end with ; or \g.
Your MySQL connection id is 10
Server version: 5.1.39 Source distribution

Type 'help;' or '\h' for help. Type '\c' to clear the current input statement.
mysql> exit
Bye
[root@meckk ~]#

MySQL のアクセスには成功しました。
後は、実際にデータベースを構築して文字化けやその他の問題が発生しないかを確かめる事にします。

試に ODBC を使用して外部から接続できるか試して見ます。

[root@meckk ~]# mysql -u root -p

Enter password: ←パスワードを入力
Welcome to the MySQL monitor.  Commands end with ; or \g.
Your MySQL connection id is 2
Server version: 5.1.39 Source distribution

Type 'help;' or '\h' for help. Type '\c' to clear the current input statement.

mysql> grant all privileges on *.* to fedora@localhost identified by '1234';
Query OK, 0 rows affected (0.00 sec)

不要と思いましたが、Window でアクセスするパソコンのローカルアドレスも許可しておきます。
(アドレスは自分の使用しているパソコンのIPアドレスを確認してください。)
mysql> grant all privileges on *.* to fedora@192.168.1.101 identified by '1234';
Query OK, 0 rows affected (0.00 sec)

mysql> create database test;
Query OK, 1 row affected (0.02 sec)

mysql> show databases;
+--------------------+
| Database           |
+--------------------+
| information_schema |
| mysql              |
| test               |
+--------------------+
4 rows in set (0.02 sec)

mysql> exit
Bye

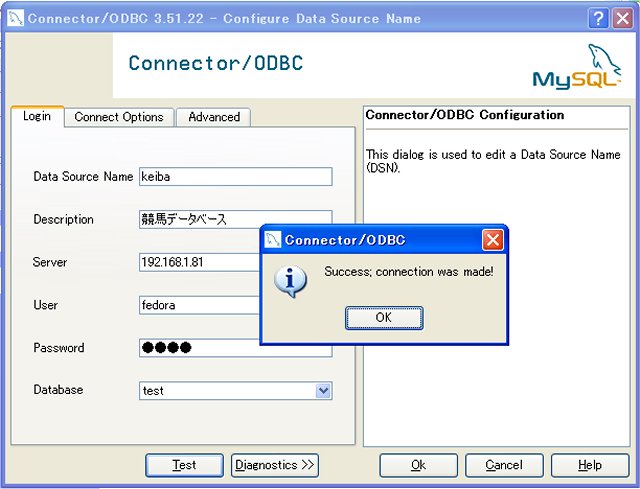
この段階で、Windows のコントロールパネルから管理ツールを選択して、データ ソース (ODBC)からシステムDSNタブで、ODBC の接続設定を行ってみました。
下記の画面のように、あっけなく接続出来たのには少々驚いてしまいました。
以前は、MySQLにはmy.cnf ファイルと言うのがあってローカルから接続させるのも苦労したものです。
ODBC のインストールや接続設定の方法も丁寧に解説しているサイトが多くありますので、迷う事は全くなくなりました。